Showing posts with label presents. Show all posts

Monday, 18 July 2016

Daisy Dress, from Simply sewing mag

I made this beautiful dress for our Christmas present to go see Phantom of the Opera (amazing by the way!)
It was a perfectly timed free pattern from the Simply Sewing magazine.


I used some vintage cotton fabric my grandmother had in her stash. It still had the label on it saying the cost of £2.80!! The total outfit cost me about £3 as I only had to buy the zips and the thread, my kind of outfit!

I traced out the size I needed and cut it all out and put it all together in just a few hours and it has so few pieces. Perfect for me as I hate the tracing out stage!


I really struggled in putting the facing around the neck area though. I sewed it all on then I couldn't turn it back the right way out. I had to unpick the shoulders and re sew them afterwards which left them a little frayed but now I know what to do next time.

I love the part circle skirt of this dress as its a perfect shape for me. And is really flattering. The fold on the neckline adds a beautiful touch and the dress would look even better in a plain fabric I think.

Beautiful dress which is perfect for work, Simply Sewing mag even included my version on their website!

Monday, 4 July 2016

Girls party dress, more scrap busting!


This is another free pattern from The Cottage Mama. You get the pattern when you sign up to her newsletter, and all the details are here.

I used the alternative bodice construction which has really good instructions the pattern download.

I used leftover fabric from my walkaway dress and the floral from the quilt I made. Luckily the two pinks matched perfectly.
The bit I struggled with for this dress was getting even gathers on the skirt. I tried I few times putting a long stitch and pulling the thread but each time the thread snapped.

In the end I used a method I found on pintrest. I cut a length of dental floss the width of the dress top. I then did a wide zig zag over the top of the floss. I tied one end of the floss to the skirt and pulled it through. It was so much easier this way!! One to remember indeed.

The end result is beautiful and perfectly twirly for the little girl to wear!

Tuesday, 3 November 2015

Another wedding gift, with hearts and a single this time!

This quilt was made for my beautiful pretend cousin, who was sharing her wedding day with her even more beautiful daughter and her christening. The brief was she wanted a blanket for the sofa to snuggle under, the more colours the better (my kind of blanket) and she likes cath kitseny type fabrics.
 
http://www.bloglovin.com/blogs/cluck-cluck-sew-1095784/making-heart-blocks-in-multiple-sizes-4129213885/
I saw a picture on pintrest of a blanket with hearts all over it and pinned in, then she liked it too so I thought we must be on to a winner! As i'm still practising with shapes and applique I thought I would do some kind of paper piercing as another challenge for myself. I wanted the hearts to be large so I made each square 30cm tall. I used the table to size my squares up on the blog link here.

I picked which fabrics I wanted to use and set about cutting the shapes out. Cutting is the bit I hate the most so I cut everything out at once. I had one large rectangle of patterned fabric, a large square of plain fabric and two small plan squares. The sizes for these are on the blog link above.


Once the sections we all cut out I set about making the heart panels. You need two sets of what's in the picture above. if you place all the squares right side facing the patterned fabric you can then sew a straight line across the diagonal of each one. Once they are sewn you can fold the fabric over and iron it leaving you half a heart as below.

You repeat the process for the second half but make sure your diagonals go the opposite way say they match up and look like a heart together. You can then sew down the middle of the heart and iron that seam open at the back so it lays flat.

I then repeated the process I uses for the other quilt as I then had a square panel ready for joining together. In order to make the hearts stand out I used mostly plain fabrics so that it really became the focal point of the quilt. It also meant that I didn't need to make as many hearts as I could bulk out the quilt with plain fabric.


Once the topper was all complete I quilted it together with one piece of backing fabric. I free motioned quilted the patterns onto the plain fabric pieces using Guttermans thread that changes colour as it goes through, you can't really see in the pictures but I gave the free motion quilting a nice edge to it as it all changed shades of purple. The pattern I used had hearts in it too. I didn't draw the pattern on as this made it too hard for me to follow the plan, so I just quilted as I went along. I also did their initials in quilting on one side for a bit of a personal touch. I binded the quilt with some extra wide hessian floral print, which added even more floral patterns on and I think really finished the blanket.

After I managed to finish the final touches the morning of the wedding I made them open the blanket while I could see them and I think they loved it!


Monday, 10 August 2015

The wedding gift.. the final touches!

I then just had to bias bind the edges! I went with blue on Grandmas recommendation (check out the first post about the quilt about having boys under it!). I bought 9 meters of this extra wide binding as I though wide gave me more error space and a meter for mess up!

I sewed the back edge all the way done about 1/4" from the edge of the quilt making sure the rest of the binding was pointing towards the rest of the quilt. You can sort of see at the bottom of this picture how it is sticking out at the bottom, this is because I then brought the binding over my first stitch and clipped it on the front. This way you can only see one set of top stitched (in theory).

These clips were a god send, free with Simply Sewing mag! It saved it faffing around with pins and I could just slide the clip down! I then sewed all the way down and folder the corners over keeping the binding all one piece.


I made this panel for the back of the quilt with same ribbon from our wedding and some bits I bought which I thought gave it a great gift tag!


There we have it one finished quilt! Which she loved by the way :) Boy am I glad of that!!

Friday, 24 July 2015

Hairdressing scissors pouch

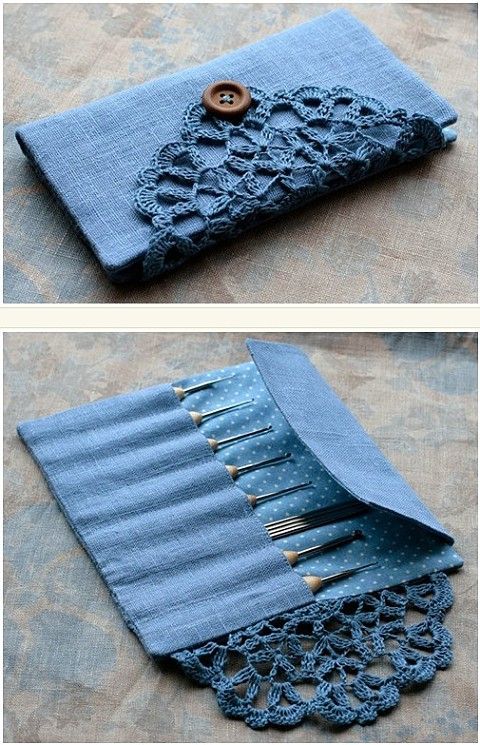
My sister is a trainee hairdresser at night school and she has worked tremendously hard at this and passed her first year! I wanted to get her something to help but she had already bought all the books and equipment she needed, so when she asked me to make her something I jumped at the chance. She had found this, again on Pintrest, which is obviously for crochet hooks and asked it I could do something like that for her scissors so I set about a plan!


When I was at Fabritastic (see last post about fat quarters sales!) I picked up this great campervan fabric! Both my sister and I are beach bums and love all things beachy, campervany and scooters!


I decided I ought to put some wadding into it other wise when the sharp scissors were in they may stab her through the fabric. So I laid out the fabric and measure my sewing scissors across 4 times and added a bit more for good measure. I then added wadding on top for about two thirds of the length as I didn't want double wadding on the pocket. Then I measured the polka dot fabric to match the campervans.
I sewed three edges leaving the bottom where I was going to put the pocket and attached the lace into the seam as it was going round. I folded the pocket up to the level I wanted it then sewed four channels leaving gaps for her scissors.
I then zigzagged the bottom edge to seal it all up, though I wasn't very good at the (must practice zipzag!) and it looked a bit messy.

I then hand sewed on the button in the right place for the lace fastener.


And there you have it!