Showing posts with label vintage. Show all posts

Friday, 6 January 2017

The Butterick Retro B6318


This was another project from the lovely people at Sew Crafty Online the fabric is absolutely beautiful and all my scraps have been carefully saved for future quilting and small projects as I couldn't bare to throw them out!

My Butterick Retro pattern has caused me a few headaches. Mostly in the boobage area! My first issue was my measurement didn't really fit the sizing. So I just made the on the was going to fit my top half with the hope the skirt would be floaty enough to survive.

As you can see even on the mannequin this appeared to be a strange shape but my hope was the waist band would pull it in a bit. Which it did beautifully on a real person, the mannequin doesn't do it justice.

I think if I were to make this again, I would take the top in slightly across the boobs as it doesn't have any dates to give the top any shape. I think they shape would be perfect for a the larger breasted lady though i'm afraid mine were a little lost!

Once the tie is around the middle you really can see the shape it is aiming for which is beautiful, though I think I have learnt to stay away from Kimono tops as they don't fit me properly. I found the tie quite hard to attache and the instructions weren't great but after some perseverance I think I cracked it.

But seriously whilst the fit isn't perfect on this dress it is absolutely beautiful because of the fabric. The flowers are so cheerful and wonderful it brightens up any day in the office! So all in all a successful escapade.

Monday, 18 July 2016

Daisy Dress, from Simply sewing mag

I made this beautiful dress for our Christmas present to go see Phantom of the Opera (amazing by the way!)
It was a perfectly timed free pattern from the Simply Sewing magazine.


I used some vintage cotton fabric my grandmother had in her stash. It still had the label on it saying the cost of £2.80!! The total outfit cost me about £3 as I only had to buy the zips and the thread, my kind of outfit!

I traced out the size I needed and cut it all out and put it all together in just a few hours and it has so few pieces. Perfect for me as I hate the tracing out stage!


I really struggled in putting the facing around the neck area though. I sewed it all on then I couldn't turn it back the right way out. I had to unpick the shoulders and re sew them afterwards which left them a little frayed but now I know what to do next time.

I love the part circle skirt of this dress as its a perfect shape for me. And is really flattering. The fold on the neckline adds a beautiful touch and the dress would look even better in a plain fabric I think.

Beautiful dress which is perfect for work, Simply Sewing mag even included my version on their website!

Monday, 4 July 2016

Girls party dress, more scrap busting!


This is another free pattern from The Cottage Mama. You get the pattern when you sign up to her newsletter, and all the details are here.

I used the alternative bodice construction which has really good instructions the pattern download.

I used leftover fabric from my walkaway dress and the floral from the quilt I made. Luckily the two pinks matched perfectly.
The bit I struggled with for this dress was getting even gathers on the skirt. I tried I few times putting a long stitch and pulling the thread but each time the thread snapped.

In the end I used a method I found on pintrest. I cut a length of dental floss the width of the dress top. I then did a wide zig zag over the top of the floss. I tied one end of the floss to the skirt and pulled it through. It was so much easier this way!! One to remember indeed.

The end result is beautiful and perfectly twirly for the little girl to wear!

Thursday, 30 June 2016

Simplicity 8065 another duvet cover dress!


I love a good 50's style dress. The tea dress style really suits my shape as it flares out at my waistline and hiding any lumps and bumps.

When I saw this pattern on the simplicity instagram I had to try it! It uses so much fabric though so I had to did out the other duvet cover I  bought from dunelm on the sale. It was a perfect colour for the summer wedding I was making this for.

The pattern was easy again because it is a wrap around dress. It is a full circle skirt so I didn't have enough table to cut it out so I had to cut it out the floor and so the dogs were desperate to help me... they aren't very good at helping!
Once I managed to cut it all out sewing it together was so quick! I was being a bit optimistic starting only the week before the wedding but I managed to finish it!

I got my beautiful flowery bias binding out again and it goes all the way around the back and the neck giving it a lovely finish. The back is a lovely crossover which is very low so I needed to get some kind of bra that wasn't so revealing.


Once I was wearing the dress it kept popping un done when I sat down. This is not ideal as its a wrap over I exposed my bum! I think I will upgrade the poppers I used to some cam snaps I have bought this week or some hook and eyes to help secure it a bit more.

I wore it with my fluffy underskirt and I felt fabulous! Perfect for dancing and making an entrance! It was lovely and plain but still made a statement, and it was talked about by the whole wedding party!

Thursday, 15 October 2015

The infamous 'Walkaway dress' Butterick B4790

After seeing this dress on The Great British Sewing Bee I instantly fell in love! My personal style is very retro and flared dresses like this flatter my curves well.
I bought the pattern on a whim when it was half price thinking I'll get round to it when I'm a bit more skilled, but no I decided to go head first on this one!

I was a bit daunted by the amount of fabric I needed to make this, so I thought if I mess it up it's going to be a huge waste of money. So whilst in Dunelm I saw that their plain block coloured duvets and sheets were on sale! I bought a bright pink and a bright turquoise double duvet for the grand total of £9! Perfect for messing things up I though!


I started by Ironing out the pattern pieces as this was my first go with a proper pattern so I was following all the things I had learnt watching plenty on YouTube! Once I have ironed them, I taped them to our living room floor then taped tracing paper over it. I copied out all the lines for my size then cut it out. I carefully folded my pattern back away and from then on only used the tracing paper and the instructions that came with the pattern.

Now as I was using a duvet the normal pattern placing on my instructions didn't quite work as my fabric wasn't the usual width or length. I made sure the folds were in the right places and I cut out enough of every piece.

Tia wasn't very helpful in this stage!

So after I cut all my piece out. I followed the instructions in the pattern to the letter, and I ended up with something that resembled a dress! Please keep in mind I am a beginning so I didn't move any of the darts or change the pattern in any way and I have since learnt it definitely needs to be done on this dress as it's a vintage pattern which doesn't fit modern bodies as well.

I then had the task of the miles of bias binding! I decided rather than buy a specific amount which I would probably end up messing up and needing to source more, I bought a 20m roll from ebay as the fabric was very plain I bought some polka dot bias binding to jazz the dress up a bit. I bought extra wide binding, half because I wanted to make life a bit easier and less fiddly and half because I wanted it to stand out.


I watched a tutorial on ebay about bias binding on clothing as I have only put it on quilts so far so there is much more of a sandwich involved. The video suggested ironing the binding in half reading to be slotted over the dress edges already ironed in place. I ironed about 4m of binding and started to put it around the dress starting on the corner of the piece that is at the back and covered by the skirt. I used my quilting clips rather than pinning it as it stopped it from being a bit too fiddly. This also helped me just keep moving the clips further down as I went the whole loop around the dress. make sure you leave extra binding along the back to tie the back panels together. I let about 20cm on either side which is enough to leave a small bow under the skirt.

I started by putting buttons in the front, but because I hadn't tweaked the pattern at all it didn't quite close properly in the middle and it wasn't very comfortable. So instead I took the buttons off and replaced it with some extra bias binding which I tie in a box at the front making it much more comfortable, and perfect for going out for a meal and overeating as it expands!

Ta daa! A very awkward looking me in an unruly looking garden!! As you can see the top it really baggy about my boobs and you may not see by under may arms is quite low and shows my bra so I would need to tweak the darts next time I make this. I'll have to learn how to do that first though! ;)

Monday, 10 August 2015

The wedding gift.. the final touches!

I then just had to bias bind the edges! I went with blue on Grandmas recommendation (check out the first post about the quilt about having boys under it!). I bought 9 meters of this extra wide binding as I though wide gave me more error space and a meter for mess up!

I sewed the back edge all the way done about 1/4" from the edge of the quilt making sure the rest of the binding was pointing towards the rest of the quilt. You can sort of see at the bottom of this picture how it is sticking out at the bottom, this is because I then brought the binding over my first stitch and clipped it on the front. This way you can only see one set of top stitched (in theory).

These clips were a god send, free with Simply Sewing mag! It saved it faffing around with pins and I could just slide the clip down! I then sewed all the way down and folder the corners over keeping the binding all one piece.


I made this panel for the back of the quilt with same ribbon from our wedding and some bits I bought which I thought gave it a great gift tag!


There we have it one finished quilt! Which she loved by the way :) Boy am I glad of that!!

The wedding gift continues!!! Basting

So I have it all stuck together with minimal glue (remember use lots!) and it has been moved upstairs ready for me to sew it all together in some the hottest days of the year! yay!
I decided to use a swirly random patterns as it was supposed to look random so it wouldn't show any mistakes I made along the way.

I watched a few videos which said if you have spray glued your 'sandwich' you can start basting anywhere in the quilt so off I set in the top right hand corner. I wouldn't recommend this as because I hadn't used enough glue I ended up with some squiggly bits with extra fabric in the middle like this.


 I made sure my feed dogs were down and just swirled the fabric around trying desperately to keep it taught and at an even stitch rate. I had real issues holding on the fabric whilst keeping it taught so my lovely husband whilst on a trip to Wickes bought me some building gloves with gripped palms. This made life sooo much easier as I could push it through with very little effort. Good job hubby!

I managed to sew right through my free motion foot though which bent my needle and got it stuck into the foot. This was because I was going too fast with the material I think and pulled it whilst the needle was on it's way out.


 It's quite hard getting a big quilt through the 'throat' of a home sewing machine. So I started rolling up the bits that needed to go through. As you can see. This left me spare to work on the square I was working on at the time whilst everything else was rolled up. I worked on a panel at a time in a patterened fashion, so I started with the top right, then I did one down and one across working my way diagonally across the quilt ending in the bottom left corner.

Hopefully you can see the difference in this picture between the bits that are basted and the bits yet to be done. It just shows you what a lovely texture it gives the finished product.


 Whilst doing this I caught the backing in my stitching a few times which left it rucked. I would recommend that once you have used plenty of glue to stop it moving always check your edge spares are hanging over the edges or they may get caught in the mix. I then cut all around the edges leaving the topper, wadding and backing all the same size.

The beginning of the masterpiece wedding gift... The block

It's at this point I thought I rally ought to get on with making the wedding gift for my cousin I had planned... with 8 weeks to go...!

My cousin has recently bought a little cottage with her soon to be husband and they were renovating it ready to move in after they were married. She loves all things 'country kitchen' and vintage etc so I thought the perfect thoughtful gift from me would be something hand made, so I thought I'd make her a quilt!

I didn't really think this through, but hey I was going to try my hardest to finish it! I didn't know what size bed she was going to have either but I would be damned if I was going to try anything bigger than a double for my FIRST quilt, so I decided not to ask...!

I sourced my fabric, 4 different colours of the same rose fabric, 4 solids in similar colours and 4 other random ones I liked the look of. I bought a meter of each and I have plenty spare! I took my Grandma with me to buy some of the fabric and as I was picking out lovely pastels (the theme of the wedding!) she said to me 'You do know there will be a boy under this blanket Rudy you'll need some manly colours...!' Cheers for that image Grandma.. Queue blues being added! Most of my Fabric is from a facebook seller or ebay, though some is from Bobb in and Sew near where I live and some from Boyes again in Goole.

I found this blocks idea on Pintrest and it is now that I look back on it and see how the colour run through in lines, I didn't see that before! So mine really was a rough copy of this in rather large form.

I cut 9 15cm squares of each of the fabrics I was going to use as squares, and 9 of each double size squares 15cm wide and 30cm tall. This was the most boring bit!! I then decided that my squares would look a bit like this..

So I set about sewing all the squares together, trying to put similar colours at opposites. Then I sewed a pair of squares to a long panel giving me 4 corners of a square. I pinned two bottom sets together on the shortest sides and sewed down then in a straight line (please bare in mind you will have extra on the long panel as there inst an additional seam). I did the same with the top the sewed all the way down the middle. Be careful at this point with you seams, it may be useful to iron them to where you want them to stay though I have aversion to the iron so do as little of that as possible!

Ta daa one square.. only 8 more to go...! As you can see it didn't quite stick to my plan but random is good sometimes :)


Friday, 24 July 2015

Hairdressing scissors pouch

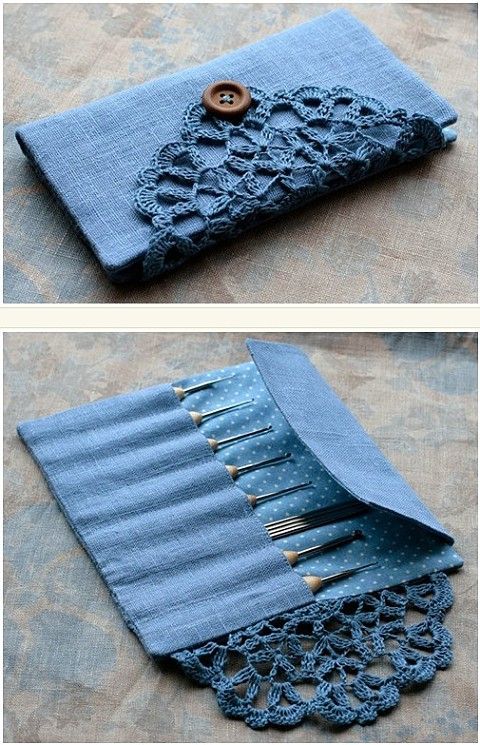
My sister is a trainee hairdresser at night school and she has worked tremendously hard at this and passed her first year! I wanted to get her something to help but she had already bought all the books and equipment she needed, so when she asked me to make her something I jumped at the chance. She had found this, again on Pintrest, which is obviously for crochet hooks and asked it I could do something like that for her scissors so I set about a plan!


When I was at Fabritastic (see last post about fat quarters sales!) I picked up this great campervan fabric! Both my sister and I are beach bums and love all things beachy, campervany and scooters!


I decided I ought to put some wadding into it other wise when the sharp scissors were in they may stab her through the fabric. So I laid out the fabric and measure my sewing scissors across 4 times and added a bit more for good measure. I then added wadding on top for about two thirds of the length as I didn't want double wadding on the pocket. Then I measured the polka dot fabric to match the campervans.
I sewed three edges leaving the bottom where I was going to put the pocket and attached the lace into the seam as it was going round. I folded the pocket up to the level I wanted it then sewed four channels leaving gaps for her scissors.
I then zigzagged the bottom edge to seal it all up, though I wasn't very good at the (must practice zipzag!) and it looked a bit messy.

I then hand sewed on the button in the right place for the lace fastener.


And there you have it!